Friday, 25 July 2008

Converting an image into a 3d cutting pattern in psp.

Now I know loads of peeps arent using scal for much more than cutting fonts... tut tut... wicked waste.
So here goes how I use psp to convert a coloured image into a pattern ready for inkscape to trace & SCAL to cut. It isnt the quickest but it's possibly the easiest for people who arent too familiar with psp.


Here's the pic I found online of a guitar.


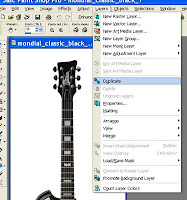
Open the image in PSP, then go to layers/duplicate
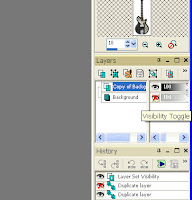
Click on the layer visibility on the layer named background. You'll get a red cross showing as in the pic but you wont notice any difference to the picture.

Chose your magic wand tool, mine is on the side menu bar. Click on the white area around the guitar.


You'll have little flashing dashes to show that you've selected the white areas.


Hit the delete button and all of the white will disappear leaving you with a chequered background.


You now need to make 2 more duplicate layers again. To make it easier to work with I like to name my layers. You do this by right clicking on the layer and chosing rename.
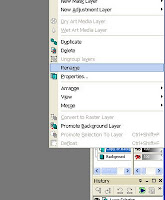
Being totally original I called mine top middle & bottom.

Because this image it too small to have 3 identical images side by side you need to change the canvas size.


DONT resize the image, as that makes the image larger but doesnt give you any room to play.


Select the move tool and use it to move your 3 images so they are all next to each other. You might notice that as you move each layer it highlights where you named each layer. This is an important feature and you need to make sure as you are working on a layer that it's actually highlighting the right one.


Make sure the top layer is highlighted and select the selection tool (the box shaped one)


Use the tool to draw a box around the guitar, (doesnt matter if it goes over the next) and click inside. Those dashed lines will appear around the outside.

Select the paintbrush tool


Colour all the way over the guitar, those dashed lines will stop you colouring over the edge so it's perfectly safe to use a large brush and really go for it.

Now for the time consuming bit, we need to rub out all the areas we dont want to cut.
Select your middle layer and zoom right in so you can clearly see the edge. It doesnt matter if you can only see a small section of the image.


Now choose the eraser tool. and very carefully rub out all the bits you dont want. If you accidentally rub out a bit too much just go to edit then click undo. You can undo as many steps as you want.

Eventually your layer will look like this. Using the same method as before draw around with the selection tool, click inside the box then paint over.
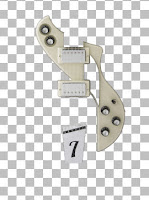
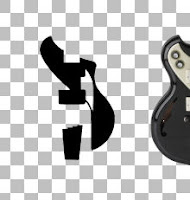

You might find a few areas that need to be erased, dont be afraid to change the size or shape of the brush if it makes it easier for you to get into small areas or create a straight line.
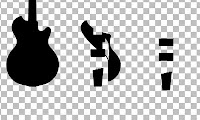

Select your top layer and repeat with the eraser
Final time to draw around with the selection tool, click inside then paint over.
You should have an image like this. As it stands it will waste a load of card when it cuts so I use the move tool to drag the shapes closer together.
If like me you use 2 pieces of different card on 1 mat make sure you leave a decent space in between otherwise you'll be fiddling around to get the card in the right spot.
Now all you need to do is save as a jpg. It will warn you that it needs to flatten the image which is fine.

There are quicker ways to get rid of the waste areas but that's for those who have more of a knowledge of the selection & drawing tools. I will try to do a tut on it but not for a few days at least ;o)


Thursday, 24 July 2008

3d guitar cut with SCAL


I used DCWV rockstar paper stack with a 3d guitar cut using SCAL. Each string had to be sewn seperately to the bottom bit then attached before sewing them to the handle. A thin strip of peeloff for the frets & a few bits of waste for the knobs. Surprisingly quick to make although it took a while to create the image in PSP. The scut file should be here, use 2 3"*7 pieces of card and have them side by side on the mat if you want to use 2 different colours the way I have.

Friday, 18 July 2008

SCAL again

Dont mention B&Q or the door, still not here and they are saying September!!

I've been having fun with SCAL (to keep my mind off of B&Q), this time cutting words into the base card.
Unfortunately the base card is a similar cream to the wallpaper so it doesnt really show the cut areas properly. If you want the scut file for the base card & the overlay it's just here and makes a 5 1/2" card. The flower is just a basic shape from paintshop pro and cut with 1cm difference each time. As always, despite having 1000s of brads I didnt have the right colour so had to dip an orange one into some embossing powder. For once I had the sense to use my long handled crocodile clip to hold while embossing so all fingers are burn free ;o)

Friday, 27 June 2008

Usable at last but fuming.


Well as promised a few pics of the playroom. I still have to fit new flooring & curtains and as you might have noticed a door on one of the cupboards......

We only ordered the units a couple of weeks ago, went to fit the doors on Tues only to find one damaged. Over to B&Q on Wed but because I didnt have the receipt with me they would only refund me £1!!!!!!!! The doors had been placed on special Monday £1 each (bl**dy typical). I didnt want a refund though, just a door, not too much to ask.... or was it?

Nope, none in stock.... "I suggest you visit every branch to see if they have any" I spent all of Thurs driving to stores as none of them bothered to answer the phone... none in any of the Bristol shops. Hubby went over this morning to be told "sorry the entire range is discontinued" and it was suggested I chose new doors. Well.... ok.... but the cantilever system (fab btw) is fixed to one and to get it out the worktops would need to be removed, we also have extra side panels which would have to be replaced. All in all the units would need to be totally dismantled, rebuilt & fitted. OK if you've nothing better to do with your time or as it was my best mates hubbies time (cheers Leon). No other suggestion was made to hubby....

I went over, very calmly doing my nut and spoke to the manager... No, replacing all the doors isnt acceptable, I dont mind glazed doors on the top but only if they are the same colour (none of them about either) no, it isnt acceptable for the door to remain missing. The manager then said he should be able to get one from their service team (legal requirement they keep parts in stock for 3 years) but it's not a quick process. Sorry mate, but speak to them and get them to send it to me direct on overnight delivery!!!!! after a bit of forcefulness on my part he agreed within a week and will ring me monday to confirm. Will wait & see if it happens... cant see it myself. B&Q have been nothing but trouble with this project, took 2 trips & a 2 1/2 hr wait just to sort out 1 length of worktop that should have been on the order.... instructions missing from the cantilever.

Would I use B&Q when we replace the kitchen later this year? NO

Other than that I'm really happy with the layout and am finding it works well for me. Still got a bit more sorting, tidying & prettying to do but at the mo I just want to sit back with a cuppa, and yes that is a kettle in the corner ;o)

Monday, 23 June 2008

Playing with SCAL again

Seeing as the playroom isnt totally finished I've been having fun with PSP & SCAL . Couldnt think what to do so I wondered if I could manage an origamic architecture card using a lattice.

Here's what I came up with.


It's quite easy to do once you've got the hang of the principle. Create the letters with a thin black edge, delete the middle and underlay a lattice then create a cutaway section around it all. Once cut all you do is score along the blue dashed lines then sort of squidge and poke it to shape. Then carefully give it crisp creases with a small bone folder. Stick along the top & bottom to the inside of the card. If your not too accurate sticking in place just trim the card slightly but it's important that the score line that goes to the outer edges lines up perfectly with the inside fold of your card.

If you dont want to make your own and with a bit of luck the file should be here. Scut file Makes a 5" sqr card. Feel free to make cards for your own use but please respect my copyright and dont share or sell the file.

Friday, 20 June 2008

Been busy creating a playroom

Eldest son announced he was moving in with his girlfriend in March. It took him over 3 months just to start clearing so like a kind mummy I went in and finished off. Within 2 days I had it all done and fresh wallpaper up, he & hubby didnt know a thing about it ;o) Cabinets & worktop were ordered the day after. It's been 13 days since I started and I'm still waiting for the top cabinets & flooring to be done :o( Not funny having nowhere to play as some stash is up here and some downstairs. Fingers crossed it will be finished this week and I can add a few photos.

I did manage to find time to make an origamic architecture card this morning. My first using SCAL but I did cheat and cut the fold tabs by hand, mainly as I wasnt sure how deep I wanted it.


While the camera was out I took a pic of this one using one of the new scrapmagic templates.


Saturday, 7 June 2008

New scrapmagic templates due soon.

Have finally been given permission to show a few of my samples for the new Scrapmagic templates. There is also a wreath & stocking template but like a donut I forgot to photo them before I handed them over. There's no official launch date on Ideal World yet but Hooked On Crafts in Kingswood, Bristol will be having a demo of them later this month.

Sleigh & Candle are using papers from an old DCWV stack. The angel is using penny black & hero arts stamps with ancient page ink. The bell used the last of my favourite black & white paper, again from DCWV, stars embossed with a judikens powder & the letters were cut on the cricut, ariel narrow .6 inch.


Thursday, 8 May 2008

More work in progress with SCAL

Here we have a bookcard, made from 2 sheets of 12*12 paper. The template was made in Paintshop Pro, using rectangle & elipses to create the yellow layers. I then used inkscape to add a scallop border. Many swear words & tantrums later (I couldnt get inkscape to do what the tutorial said it should) it looked right on the screen. So everything was sent to SCAL to cut. It looks a bit rough but now I know the template works I can make one with "Best" card and decorate it. I think Tilda may be coming out to play.


This is made from four intricately cut squares and folded a la teabag before being stuck together. When closed it looks like a book but opens out to create a star. I have cut it by hand before but that was hard & long work so I only made 1 as a xmas pressie for a lady at hubbys work and swore I'd never make another. Along comes SCAL and the cricut and I just had to see if it could be done lol. All in all took 5 minutes.

The orginal pattern is one I've had on the pc for years and probably from Marivi Victoria Garrido, an incredibly talented paper cutter & origamic architecture artist I met online at yahoo groups several years ago.

Monday, 28 April 2008

Using the cricut like a robo with Sure Cuts A Lot

When craftrobo was first introduced I talked my mate into buying one, the pair of us just couldnt get it to work right. We spent hours with tutorials and when eventually it did start cutting it was 50/50 whether it would cut the card properly or not. All in all it was a bad buy for her and spent time gathering dust until she sold it. We were both gutted as others were getting good results and neither of us are dunces when it comes to pcs & graphics programmes. Sara then bought a cricut, wow what a difference... it cut everytime and was easy to use. She was over the moon with it but it wasnt for me, I rarely use diecuts and wanted to be able to do my own thing not what someone else has designed. I decided that I'd wait until the robo cut as well as the cricut.


Jump on a year and while reading the forum at UKscrappers someone mentioned there was a programme you could connect to a cricut and you could design your own patterns. I instantly realised that if this was true it was exactly what I'd been waiting for. Now being a bit of a sceptic I rang Sara and got her to download a trial version... within minutes she was on the phone saying WOW and paying for the full version. I dithered for a week or two (as I'm prone to) as to whether I'd really use one.... then while looking at how much carts are going for on ebay (Sara is selling all of hers now) I saw an expressions at a really good price and had to click to buy... Next day I went to see Sara use the Sure Cuts A Lot programme to cut a silhouette image on her cricut. Less than 2 mins later her cricut was cutting it out!! Normally I'm over hers for ages but my cuppa went down my throat in record time and I was making excuses to leave. She understood lol.


Now I havent actually finished anything but I was so excited by it I felt I had to share how & what I've done.

An A5 lattice gatefold card.


Now it's only cut on cheap duo card to show the lattice and it needs a wee adjustment (doors dont quite meet when closed) but it does show that the cricut will cut patterns without buying extra carts.

Here goes with how I managed it. It sounds complicated but trust me once the image was drawn it took a couple of minutes. If you are starting with a black & white image it wont take you very long.

Here's the image (drawn in PSP on a transparent background). Save it as a .jpg file and close/minimise your graphic programme.

Open Inkscape (www.inkscape.org free programme) and load your file. Click the image to select it then click Path, trace bitmap.

You'll have a blank image on the pop up box or the image you last traced, doesnt matter either way. Click update, then OK, then click the cross to close the box.
Save the file, this time as a .svg format. Close or minimise inkscape.

Open your Sure Cuts A Lot programme (www.craftedge.com) and import the file you've just saved. DONT click open file, it must be import.

Now all you need to do is resize & position the image where you want it. Then click the scissor icon to make it start cutting.
It might sound like gibberish but it really is simple.
Now I have to add just in case the legal bods read blogs, Provocraft do not endorse this programme, it is nothing to do with them and it's best to read about the technical bits at craftedge. The craftrobo has been improved since Sara had hers, they arent for us but others love them. If you're thinking of buying one go, see a demo and make your mind up based on the demo not whether I or others didnt get on with it.

2 Tildas

Thanks to the ladies that have left comments and nominated me for awards, havent figured out how to put them here but I will have another go later.

Now, I know I said not to look for stamping here as it's not really my thing but Tilda is an exception. I dont know what it is but there's something about these stamps that I actually love. Wish I had more time to play with them but I'm generally doing samples for shops that I have to use items they sell.


Petticoat tilda is probably one of my favourites, although the pic doesnt show it she has been coloured with polychromos with some paper piecing. Papers are from DCWV All Dressed Up stack, sentiment is a penny black clear stamp.


This was playing around with a sketch from a dutch group and ended up being nothing like it. Tilda was stamped on the reverse of some linen card and coloured with polychromos. Normally I would use smooth cardstock but I wanted to get a textured effect on her jeans. The large circles are cut using a CM cutting system and the sentiment with 2 nestie dies. I've got dozens of different colour prima & silk flowers but I never seem to have the right colours so I ended up using my clip punches.


Tuesday, 1 April 2008

Star Collection stencil


Here are another 2 made for Art Of Craft this time I've used this star collection stencil. I've played about with the placement and have found so many different ways of using it that it's going to be one of my all time favourites.
The lily decoupage is from Joy Crafts, all I've done is emboss the simple flourish in the corners on some white card. Matted & layered on pale blue pearl & a dark blue with a few stick on pearls & an organza bow. Very simple and not too time consuming.
The pansy card uses papers from Joy Crafts and added some stickles glitter glue. Same stencil but a different section. Again I've embossed into the corners but this time I've played with my knife and cut away the lattice area. Hidden under the white card is my favourite deep purple card which peeps through the cutwork. Not sure if there's a brand to it but I buy a1 sheets at the Range. This is then mounted on some green glittery paper from a DCWV stack and a 14.5cm sqr base card. I've had real fun adding plenty of bling with 2 shades of purple 2mm and deep green 4mm gems. To stick gems I find it best to use art institute or anitas tacky glue applied with a tiny steel nib. I dip the tip of a cocktail stick either into the glue or a pot of water, the moisture is enough to pick the gem up and move into place.

Suzy stencils from Marianne Design.


These are both samples made for Art Of Craft and are made from the same new Suzy template from Marianne Design. The floral decoupage is from Joy Crafts. I've used a flourish stamp with versamark & some stampendous gold detail powder to create the illusion of a background paper it's then been layered on some gold silk mirri. A plain gold border peeloff helps define the area. The suzy template has been used twice to emboss on to white pearly card. Both patterns have been cut, embroidered with a gold rayon thread and finished off with some gems then mounted on green card & gold satin mirri.

The elephant paper is from Marij Rhyder. This time I've cut the same white card into a 13cm square. On the reverse I marked a 2cm border and used this to position the stencil into the corners. It's then been embossed and had a few areas cut away. I've used the same gold satin mirri & some red card to matt & layer. I'm a bit of a magpie and love sparkly things so added a few small green gems, the bindi style ones are from Joy Craft. A nice organza bow in the corner with some gold bead chain threaded through and a peeloff to finish. I think I might pop to the shops later and get another elephant sheet to make it 3d but I'm housebound until Argos turn up with the new tallboy & bedside cabinets so it might stay as is.