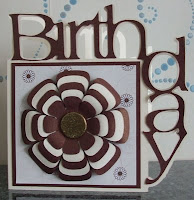
As promised here's the step by step on how to make a corner word card in PSP.

Chose the font tool and select a nice chunky font without any thin flourishes as these might be too fine to cut well. For this one I used rounded arial and chose 300 as the size.


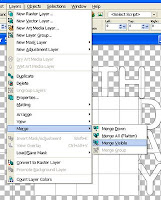
Go to layers and merge visible.
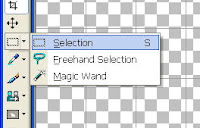
Chose the rectangular selection tool and use it to draw a large rectangle over the image making sure it covers all of the image. Click anywhere inside and the lil dashed lines will be all the way around the edges of the image. Chose the paint brush tool and colour it in. For speed I use as large a brush as possible.
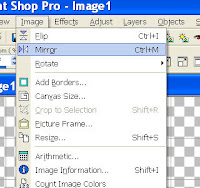
Click selections, select none then layers, duplicate layer. Now click image/ mirror.
Your image should look something like the one below.
If you look closely you'll see that the 2 layers are larger than the image, go to image/canvas size and enlarge the canvas width, I changed to 24 * 24. The size doesnt matter as long as it's big enough to fit both layers side by side and a bit of spare space.
Zoom in until you have a really good view of the top of the image. Use the move tool to get both layers joined up. It's important to get them lined up accurately otherwise when you fold the back wont be the same as the front.


Open a new image with a transparent background. I have an expressions so generally use one 12*12 inches.
Go to view and click change grid, change the horizontal & vertical spacing to 1 inch. Go back to view and click to view the grid if it isnt showing.

Chose the font tool and select a nice chunky font without any thin flourishes as these might be too fine to cut well. For this one I used rounded arial and chose 300 as the size.
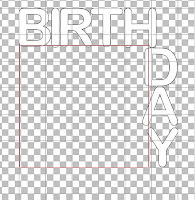
Create a new layer and type the first letter you want, create a new layer and type the 2nd letter, create a new layer & type the 3rd. Carry on with a new layer for each letter. This is important as you need to be able to move each letter individually. At this stage it doesnt matter whether the letters are clearly spaced, on top of each other or even in the right order.

Select the move tool and move each letter in to place. I use the 1" grid as a guide, making sure that the top & right side are all lined up tidily.

Once you're happy with the placement save the image as a jpg, this is so that you can create an inner layer in scal.
Now chose the draw shape tool from the right hand task bar and draw a rectangle from the top inner right corner down to the bottom left corner. Make sure you overlap a tiny bit of the letters otherwise they wont be attached to the finished card.

Go to layers and merge visible.

Chose the rectangular selection tool and use it to draw a large rectangle over the image making sure it covers all of the image. Click anywhere inside and the lil dashed lines will be all the way around the edges of the image. Chose the paint brush tool and colour it in. For speed I use as large a brush as possible.

Click selections, select none then layers, duplicate layer. Now click image/ mirror.

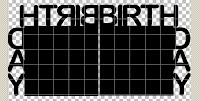
Your image should look something like the one below.

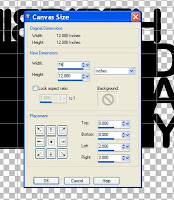
If you look closely you'll see that the 2 layers are larger than the image, go to image/canvas size and enlarge the canvas width, I changed to 24 * 24. The size doesnt matter as long as it's big enough to fit both layers side by side and a bit of spare space.

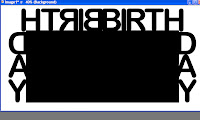
Zoom in until you have a really good view of the top of the image. Use the move tool to get both layers joined up. It's important to get them lined up accurately otherwise when you fold the back wont be the same as the front.

Once you're happy, layers/flatten. Zoom out and use the crop tool to get rid of the excess white areas. Save as a jpg and use inkscape to convert to an SVG ready for scal to cut.

Once cut it's just a case of scoring down the middle and decorating.
No comments:
Post a Comment